Guide: Setting up octopus-deploy-ai-steps in your Octopus instance
This post walks through setting up octopus-deploy-ai-steps — a reusable step template that drops Claude Code or GitHub Copilot CLI into any Octopus runbook or deployment process. By the end, you’ll have a working Octopus step that accepts a prompt, runs an AI agent against your environment, and publishes a markdown report as a deployment artifact.
This is the foundation PoC for the AI Pipelines proof-of-concepts. Later posts will pick up a specific scenario and walk through the implementation in detail.
What is octopus-deploy-ai-steps?
To test out the idea of headless agents in CD, I figured it would be cool to invoke an AI agent directly from an Octopus step. I wanted to see how the agent’s reasoning could be integrated into Octopus Deploy, and what the experience of using it would be like for an Octopus Deploy user. I built the octopus-deploy-ai-steps project in April 2026 to make it easy for anyone to do the same.
Fundamentally, it’s an Octopus Deploy step template that you can add to your Octopus instance, which gives you a new step type that runs an AI agent based on your prompt and configuration. It can be used across the workflow primitives that Octopus Deploy offers - runbooks, deployment processes, process templates, and project templates. You add it like any other step to your workflow, it expects some inputs which you can supply either directly or route it through a variable.
I highly recommend reviewing these docs before you get started:
- Octopus Deploy Step Templates
- Architecture of octopus-deploy-ai-steps
- README of octopus-deploy-ai-steps
Prerequisites
- Octopus Deploy 2024.1 or later
- An Anthropic API key (for Claude Code) or a GitHub token with GitHub Copilot scope (for GitHub Copilot CLI)
- A Linux worker with Docker for container mode (recommended), or any worker with internet access for local mode
kubectlconfigured on the worker if you intend to use the agent for Kubernetes tasks- Familiarity with Octopus step templates and variable sets
How does it work?
Before configuring anything, here’s a quick primer on how this works if you haven’t read through the links in the prerequisites section. The step template is a shell script (Bash for Linux, PowerShell for Windows) that you point Octopus at via a Git source. When the step runs, it:
- Reads routing flags to determine which agent and execution mode to use
- Optionally installs dependencies (Node.js, the CLI tool) if running in local mode
- Writes an MCP configuration file if you’ve provided one
- Resolves the prompt — from inline text, a local file, or a GitHub URL
- Runs the AI CLI non-interactively with the prompt and any tool configuration
- Captures stdout and stderr to the working directory
- Publishes the output as an artifact attached to the Octopus deployment task
- Optionally cleans up the working directory
The routing is handled by two entry point scripts:
scripts/octo-ai.sh— Linux and macOS workersscripts/octo-ai.ps1— Windows workers
Three flags drive the behaviour:
| Flag | Options | Notes |
|---|---|---|
--ai-agent | claude or copilot | Which CLI to run |
--os | linux or windows | Determines which scripts are sourced |
--mode | container or local | Container pulls a pre-built image; local installs directly on the worker |
flowchart TD
    Caller["Octopus Step\n--ai-agent --os --mode\n--prompt-content --mcp-configuration\n--allowed-tools --max-turns"]

    Entry["octo-ai.sh / octo-ai.ps1\nreads routing flags only\npasses all args verbatim"]

    InstallDeps["install-dependencies.sh / .ps1\n(local mode only)"]

    AgentScripts["claude-linux.sh · claude-windows.ps1\ncopilot-linux.sh · copilot-windows.ps1\nsources lib/common.*"]

    ResolvePrompt["resolve_prompt"]
    WriteMCP["write_mcp_config"]
    InstallNode["install_node + install_npm_tool\n(local mode only)"]

    AICLI["AI CLI\nclaude -p ...  /  copilot --prompt ..."]

    Output["stdout → output.json\nstderr → agent-stderr.log"]

    Artifacts["publish_all_artifacts\nPOST /api → Octopus artifact API"]

    Cleanup["cleanup_workdir\n(if --cleanup=true)"]

    Caller --> Entry
    Entry -->|"local + install-deps=true"| InstallDeps
    InstallDeps --> AgentScripts
    Entry --> AgentScripts
    AgentScripts --> ResolvePrompt & WriteMCP & InstallNode
    ResolvePrompt & WriteMCP & InstallNode --> AICLI
    AICLI --> Output
    Output --> Artifacts
    Artifacts --> Cleanup
Phase 1: Register the step template in Octopus
Octopus supports Git-sourced step templates, which means you can point directly at the repository rather than copying scripts into the library.
- In Octopus, go to Library → Step Templates → Add Step Template.
- Choose Run a Script as the base template type.
- Under Script Source, select Git repository.
- Under Authentication, you can choose to use Anonymous as the repository is public. Alternatively, if you have GitHub Connections already established in Octopus, you may use the appropriate option. In this guide, I use a “GitHub Connection” for auth.
- Set the repository URL to
https://github.com/rohitnb/octopus-deploy-ai-steps. - Set the branch to
main. - Set the script file to
scripts/octo-ai.shfor Linux workers, orscripts/octo-ai.ps1for Windows.


Phase 2: Configure script parameters
The step template exposes a set of parameters that control everything from agent selection to cleanup behaviour.
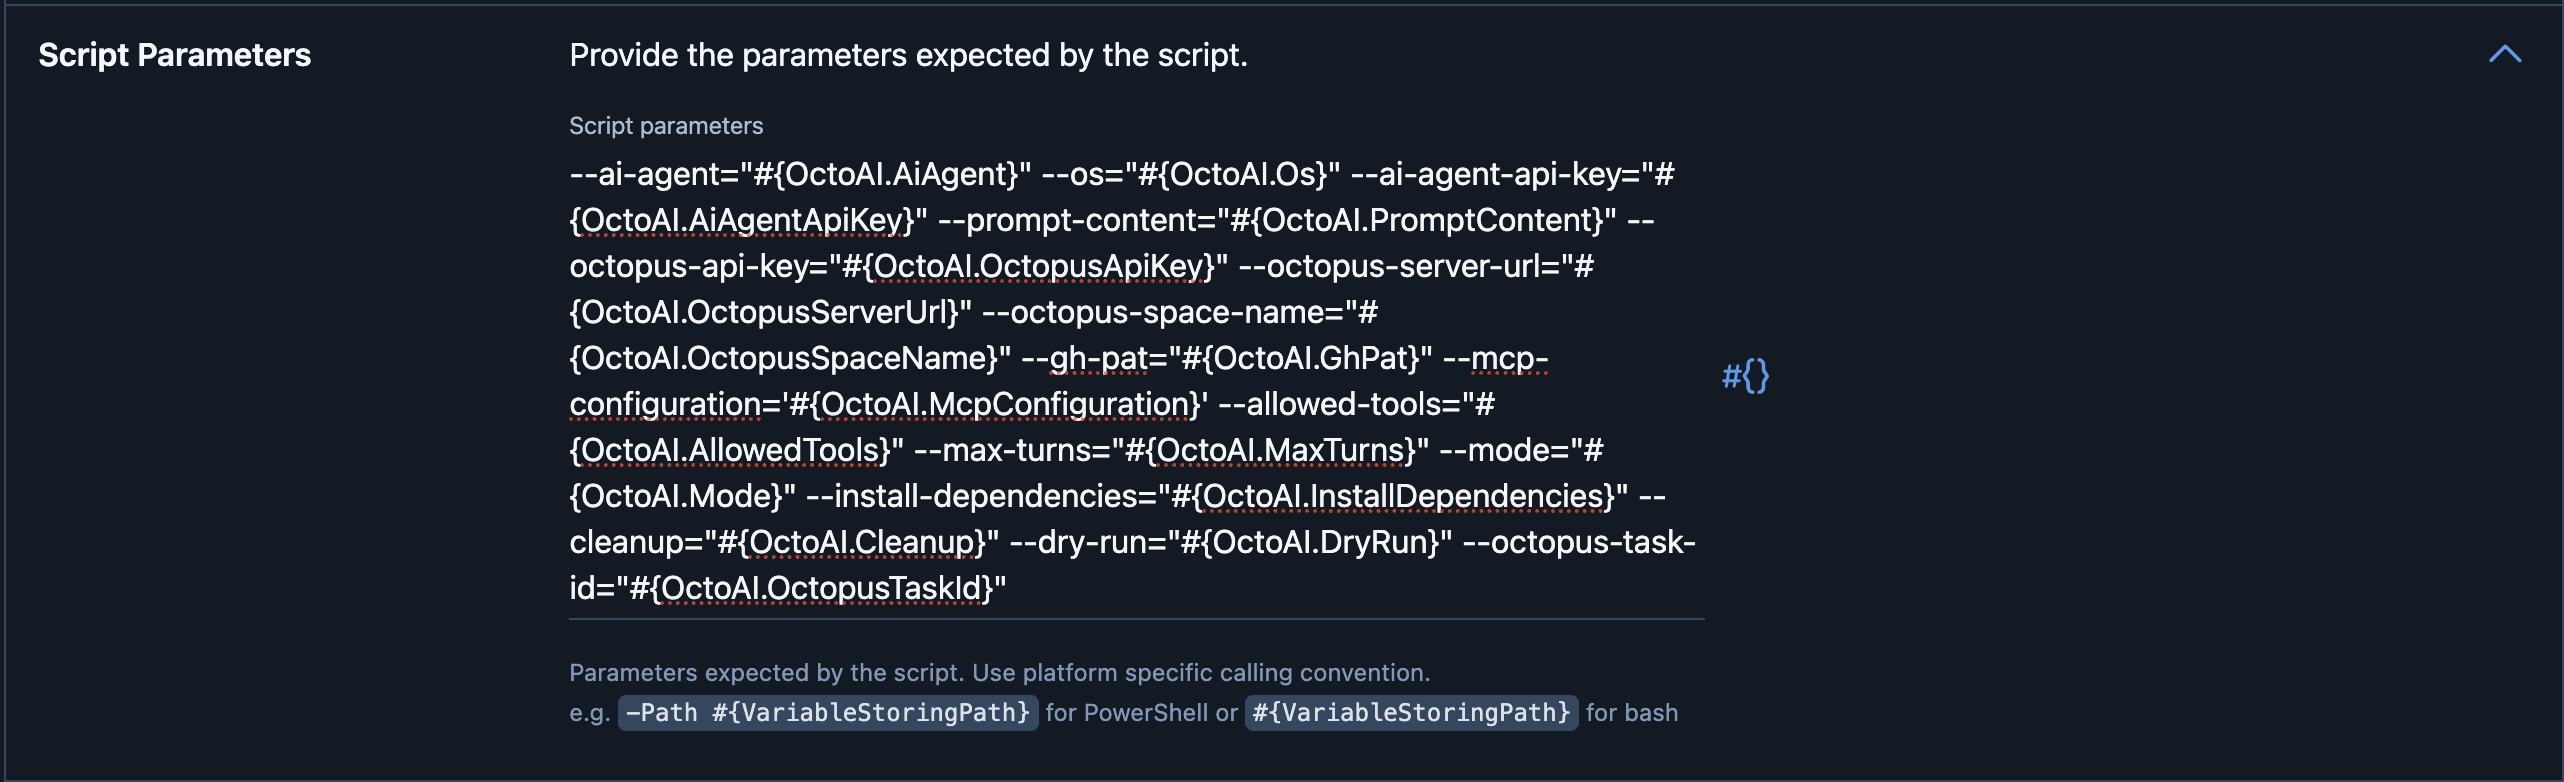
Under script parameters, construct the argument string using Octopus variable substitution syntax (#{…}) so each flag maps to a declared template parameter and avoids hardcoding values.
1
--ai-agent="#{OctoAI.AiAgent}" --os="#{OctoAI.Os}" --ai-agent-api-key="#{OctoAI.AiAgentApiKey}" --prompt-content="#{OctoAI.PromptContent}" --octopus-api-key="#{OctoAI.OctopusApiKey}" --octopus-server-url="#{OctoAI.OctopusServerUrl}" --octopus-space-name="#{OctoAI.OctopusSpaceName}" --gh-pat="#{OctoAI.GhPat}" --mcp-configuration='#{OctoAI.McpConfiguration}' --allowed-tools="#{OctoAI.AllowedTools}" --max-turns="#{OctoAI.MaxTurns}" --mode="#{OctoAI.Mode}" --install-dependencies="#{OctoAI.InstallDependencies}" --cleanup="#{OctoAI.Cleanup}" --dry-run="#{OctoAI.DryRun}" --octopus-task-id="#{OctoAI.OctopusTaskId}"
Each variable within
#{..}corresponds to a parameter that will be exposed to the consumers of the step template. I recommend exposing every parameter. Switch to the “Parameters” tab within Octopus and add the parameters as defined below. Feel free to adjust the names and descriptions to fit your team’s conventions and to provide clarity on what each parameter does.All parameters:
Parameter/Variable name Label Control type Default value Notes OctoAI.AiAgentAI Agent Drop-down list claudeOptions: claude,copilotOctoAI.OsWorker OS Drop-down list linuxOptions: linux,windowsOctoAI.ModeMode Drop-down list containerOptions: container,local. See Execution modes.OctoAI.AiAgentApiKeyAI Agent API Key Sensitive text box (empty) Anthropic API key or GitHub token. Bind to a sensitive variable. OctoAI.OctopusApiKeyOctopus API Key Sensitive text box (empty) Octopus API key used to publish artifacts. Bind to a sensitive variable. OctoAI.OctopusServerUrlOctopus Server URL Single line Text box (empty) Base URL, e.g. https://octopus.example.comOctoAI.OctopusSpaceNameOctopus Space Name Text box DefaultName of the space, not the ID. OctoAI.PromptContentPrompt Content Multi line text box (empty) Inline text, local file path, or GitHub file URL. OctoAI.InstallDependenciesInstall Dependencies Drop Down falseSet to trueforlocalmode on a clean machine.OctoAI.GhPatGitHub PAT Sensitive text box (empty) Required for private GitHub prompts or the GitHub MCP server. OctoAI.McpConfigurationMCP Configuration Text area {"mcpServers":{}}JSON MCP server config. Use $OCTOPUS_SERVER_URL,$OCTOPUS_API_KEY,$OCTOPUS_SPACE, and$GH_PATas placeholders within the JSON — they are substituted at runtime.OctoAI.AllowedToolsAllowed Tools Text box (empty) Comma-separated tool list. Leave empty to use the agent default. OctoAI.MaxTurnsMax Turns Text box 15Maximum agentic loop iterations. OctoAI.CleanupCleanup Working Directory Drop Down falseDeletes the temporary working directory after the run. Set to falsewhen debugging.OctoAI.DryRunDry Run Drop Down falseSkips Octopus REST API calls and emits service messages instead. Useful for testing without publishing artifacts. OctoAI.OctopusTaskIdOctopus Task ID Text box #{Octopus.Task.Id}Links published artifacts to the current deployment task. The built-in #{Octopus.Task.Id}variable is the correct default.
Under the Settings tab, set a name, logo, and description for the step template. This will help users identify it when adding it to their runbooks and deployment processes.
Save the step template. It should now be available in the library for use in any project.
Phase 3: Store secrets in a variable set
A Variable Set lets you centralise all the configuration that is shared across multiple projects or deployments. You bind the variable set’s variables to the step template parameters instead of typing values into each project individually or needing to modify the process definition.
You don’t need to create variables for every parameter — only the ones that should be shared or that contain sensitive values. For example, you might choose to set OctoAI.Mode and OctoAI.MaxTurns directly in the step parameters since they are unlikely to change between runs, while storing API keys and server URLs in variables.
For simplicity, I recommend matching the variables with the parameters you defined in the step template, but you can choose any naming convention that works for your team. Just make sure to bind them correctly when configuring the step later.
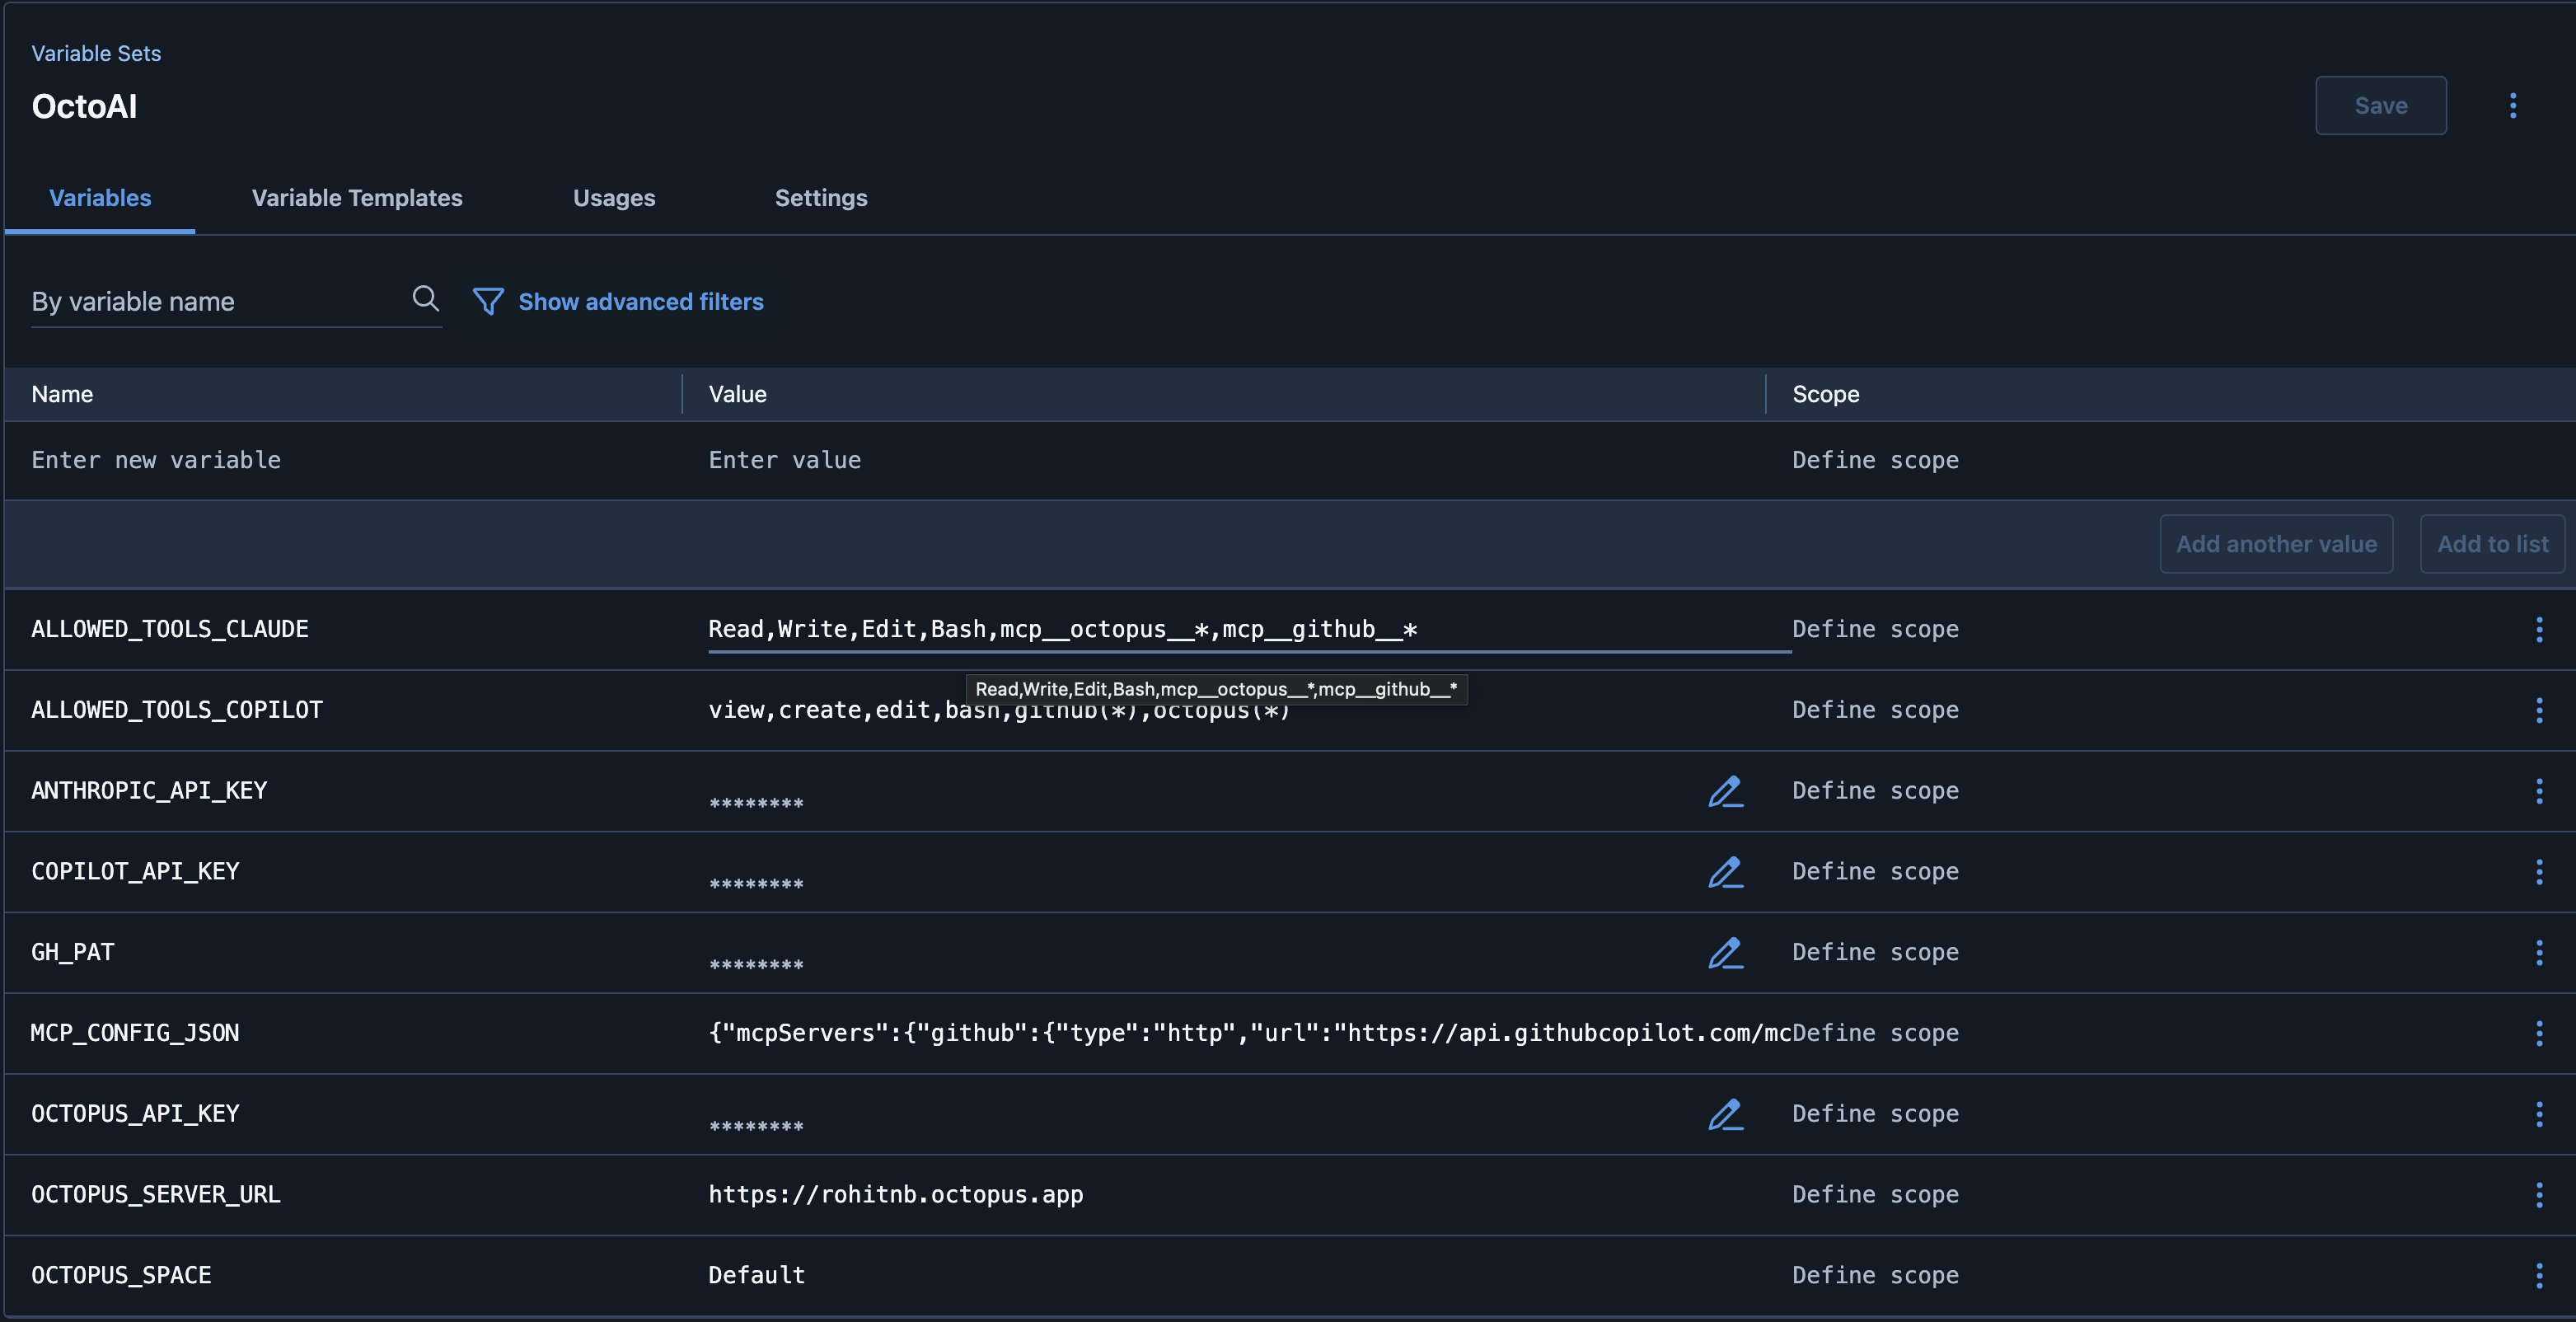
- Go to Library → Variable Sets → Add Variable Set. Name it something like
AI Pipeline Credentials. - Add variables for your Anthropic API key, Octopus API key, and server URL.
- Mark all key and token variables as Sensitive — Octopus will mask them in task logs.
- In each project that uses the AI step, include this variable set under Variables → Library Variable Sets.
Connection Variables
| Variable name | Example value | Sensitive |
|---|---|---|
OctoAI.AiAgent | claude | No |
OctoAI.AiAgentApiKey | sk-ant-... | Yes |
OctoAI.OctopusApiKey | API-... | Yes |
OctoAI.OctopusServerUrl | https://octopus.example.com | No |
OctoAI.OctopusSpaceName | Default | No |
OctoAI.GhPat | github_pat_... | Yes |
Execution Variables
| Variable name | Example value | Sensitive |
|---|---|---|
OctoAI.Mode | container | No |
OctoAI.Os | linux | No |
OctoAI.MaxTurns | 15 | No |
OctoAI.Cleanup | false | No |
OctoAI.DryRun | false | No |
OctoAI.AllowedTools | (empty — use agent default) | No |
Note: OctoAI.OctopusTaskId does not need a variable in the set — the parameter default (#{Octopus.Task.Id}) is resolved automatically by Octopus at run time.
MCP Server Configuration
Store your MCP server JSON in a single variable. Use the placeholder tokens ($OCTOPUS_SERVER_URL, etc.) rather than hardcoding values — the scripts substitute them at runtime.
| Variable name | Value |
|---|---|
OctoAI.McpConfiguration | {"mcpServers":{"octopus":{"command":"npx","args":["-y","@octopusdeploy/mcp-server"],"env":{"OCTOPUS_URL":"$OCTOPUS_SERVER_URL","OCTOPUS_API_KEY":"$OCTOPUS_API_KEY","OCTOPUS_SPACE":"$OCTOPUS_SPACE"}}}} |
Execution modes
Container mode (recommended for Linux workers with Docker) pulls a pre-built image from GHCR that includes Claude Code, Node.js, and kubectl.
Set --mode=container and leave --install-dependencies unset.
Local mode runs the scripts directly on the host. Useful when Docker isn’t available — a bare VM, a deployment target you don’t control fully, or a Windows worker. On first run, set --install-dependencies=true and the script will install Node.js and the CLI tool. Subsequent runs can set --install-dependencies=false to skip the installation step and save time.
Configure MCP servers (optional)
The step accepts MCP configuration as a JSON string. Here’s a sample:
1
2
3
4
5
6
7
8
9
10
11
12
13
14
15
16
17
18
19
20
21
{
  "mcpServers": {
    "github": {
      "type": "http",
      "url": "https://api.githubcopilot.com/mcp",
      "headers": {
        "Authorization": "Bearer $GH_PAT"
      }
    },
    "octopus": {
      "type": "stdio",
      "command": "npx",
      "args": ["-y", "@octopusdeploy/mcp-server"],
      "env": {
        "OCTOPUS_SERVER_URL": "$OCTOPUS_SERVER_URL",
        "OCTOPUS_API_KEY": "$OCTOPUS_API_KEY",
        "OCTOPUS_SPACE": "$OCTOPUS_SPACE"
      }
    }
  }
}
The step substitutes any ${VARIABLE} placeholders in the JSON with values from the Octopus environment before writing the config file. Store the raw JSON in an Octopus variable and bind it to the MCP Configuration parameter.
Restrict tool access with an allowlist
By default, the agent can call any tool available to it. For runbooks where you want the agent to read and reason but not take write actions, pass a comma-separated allowlist to --allowed-tools.
For a read-only Kubernetes inspection runbook:
1
kubectl,octopus_api_get
For a runbook that should only read logs:
1
kubectl_logs,kubectl_describe
The allowlist is enforced by the CLI tool itself — the agent will not attempt calls outside it. This is the primary safety mechanism for limiting agent scope in production runbooks.
Known limitations
Prompt quality is everything. The step template is a delivery mechanism — it gets the agent to the environment with the right credentials and tools. What the agent actually does depends entirely on the prompt. Vague prompts produce vague reports. The investment in prompt design pays off in report quality, and it’s worth treating prompts as versioned artifacts just like the scripts themselves. A GitHub URL prompt source makes this easy.
Container mode image updates are manual. The pre-built image on GHCR is pinned by the step configuration, not auto-updated. When Claude Code or Copilot CLI release significant updates, you’ll need to pull a newer image tag and update the step configuration. There’s no automatic signal that this is worth doing — it’s a gap worth closing with a periodic review process.
MCP server stability varies. Some MCP servers are well-maintained; others are community projects that may lag behind API changes in the underlying service. If an MCP server is a critical part of your runbook, test it separately from the AI step and treat it as a dependency with its own reliability profile.
Local mode creates drift risk. If you’re running multiple workers in local mode, CLI versions may diverge across workers over time unless you have a process for keeping them in sync. Container mode sidesteps this entirely.
Artifact size isn’t bounded. A very long-running agent on a complex diagnostic task can produce a large report. Octopus doesn’t enforce a size limit on artifacts, but large artifacts slow down the task summary UI. Setting --max-turns caps the agent’s reasoning depth and keeps reports to a manageable size.